Get All Your Model Train Needs Online Here

Click Here For Railwayshop

Railroad Train Art

Click Here For Railroad Art

Friday, October 10, 2008

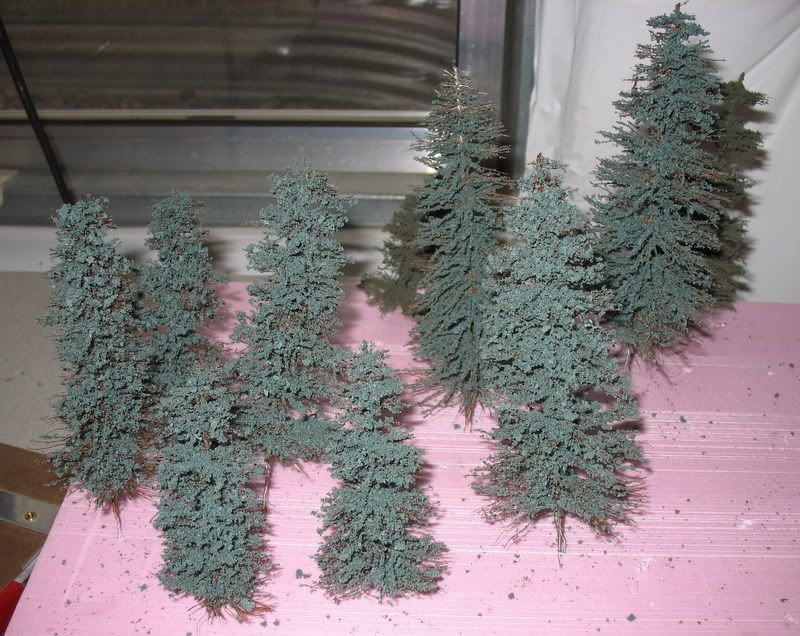
Simple Evergreen Trees for Your Model Train Layout

model train set trees

What model train layout is complete without an abundance of trees... especially if your train layout includes hills and mountains like mine.

One of my favorite techniques for background trees is the tried and true bottle brush technique. They are cheap and easy to make. Even with my short attention span, I can knock out a dozen pretty quick.

Material List:

  • Sisal twine
  • Wire (regular steel or aluminum works well)
  • Walthers goo
  • Brown spray paint
  • Coarse ground foam of desired foliage color. I prefer a bluish green.
  • Block of foam to hold the trees

Tools:

  • Wire cutters
  • Scissors
  • Cordless drill with hook to twist trees. Can be easily made from coat hangar.
  • Vise to hold the trees during twisting

Steps:

  1. The first step was to cut the sisal twine into approximately 12′ lengths and boil. Yes, your family may give you strange looks, but what model train aficionado isn't used to that? . After boiling for a couple of minutes I draped the wet twine over some pipes in the basement to dry. I attached a clamp to the ends to hold them straight. The boiling helps to straighten the fibers.

  2. Cut the fibers into pieces ranging from 1/2″ to 2 1/2″. I typically put them in three piles - short, medium, and long.

  3. Cut the wire into pieces approximately 2″ longer than twice the desired height of your trees. I typically create trees in the 4-8 inch range.

  4. Now the fun begins. Fold the wire into tight V shape and apply Goo to one leg of the V leaving about an inch clear on each end. Attach the twine pieces up the wire working from wide to narrow. Spread the fibers apart using your fingers. The Goo gets tacky very quickly and will hold the twine for the next step.

  5. Tighten the V together and clamp the free ends into the vise.

  6. Twist slowly until the fibers rotate around to complete the tree shape.

  7. Remove tree from vise and cut off top loop with wire cutters. Leave the free ends for a trunk to hold onto. Trim the stray strands with scissors and make it look like a tree. Next, apply fairly heavy spray paint. Your lungs would appreciate it if you did it outside. If you have to do it inside, use a respirator.

  8. Sprinkle on ground foam from top, bottom, and sides. Shake off excess. If you are smart you will do this over top of something in order to recover the excess. Do not do it over the area you used for the spray paint step. It goes much faster if you batch each of the steps.

  9. Stick it into foam until planting time and enjoy. You now have a beautiful new bottlebrush tree to complement your hopefully as beautiful model train set!


Click Here To Visit Railwayshop

Tuesday, October 7, 2008

Landscaping Around Your Model Train

Model Trains Landscaping

Model train landscaping is one of the more enjoyable aspects of the model train hobby. Most fun is planning and executing the scenery and landscaping that your track and engines will meander through. For some it is almost like playing God in that you can decide and create any scene you desire.

From fanciful hobbit themes, alien worlds or realistic re-creations: there is nothing that you cannot create and display. All it takes is a plan, some materials, a little skill and some time.

First and foremost you need a plan or at least a concept.

Do you want to duplicate an existing landscape?
Do you want a faithful historical recreation of a place now lost in time?
Are you more inclined to creating a never-before seen or unlikely scenario to wow the masses?

Making a choice on one theme for your layout and staying true to that theme is perhaps the most important keys to success. If you change your methods and style in the middle of your landscape the result will be inconsistencies that will detract from the overall impression you are trying to form.

Ideally those you invite to view your work will see a delightful scene, and the harder they look the more detail they will find. Nothing is more enjoyable than hearing those delighted squeals when a viewer notices ever more subtle details as he looks closer and closer. The key to obtain such results is consistency and persistence.

Once you have a plan for the theme you need to decide on track placement and terrain. Many modelers create the terrain and then try to force the track to follow through that, just as occurs in real life ” but one of the advantages of modeling vs. real life is that you can consider all aspects and requirements up front. If you know you will have a bend or a switch at certain points why design rough terrain that you will then try to overcome with ‘grading’ in your models at those points?

Next you should collect your materials. Some items you can find around the house; others you may wish to purchase from dealers such as www.oakridgehobbies.com and www.jttmicroscale.com or your local hobby shop, but always stay true to your plan. Just because you find an amazing little miniature you long to use doesn’t mean it belongs in your model! Common materials you will need include:

1. Tables or Stands

2. Plywood (preferably outdoor grade) for base if using stands or building model train tables

3. Glues

4. Twigs, ‘dirt’ gravel, crushed or powdered stones, herbs etc. for plants and groundcover

5. Paints of various kinds for touch-up, covering the base and backgrounds, creating model railroad water areas, etc.

6. Poster board, wax paper, aluminum foil, tissues etc. for texturing and shaping

7. Styrofoam blocks and sheets for shaping


Optional items you may wish to use include:

8. Plaster of Paris and / or fiberglass

9. Talcum powder, pepper and salt, cayenne pepper ” for texturing and colorants

10. Corkboard and cork ‘paper’

11. Roof repair tar (for road surfaces etc.)

12. Paintable caulks and adhesives for securing items in place

Click Here To Visit Railwayshop

Wednesday, October 1, 2008

Model Train Controllers

Model Trains Electric Controller
In the past 100 years, many types of electric controllers for model trains have been developed.

The first and most straightforward method was the use a simple variable transformer as introduced by Lionel in 1906 to lower the Alternating Current [AC] voltage from the wall to a lower, safer value and allow the user to control the speed of an electric model train by changing the amount of AC power applied to the track. In the 1920’s, Lionel included remote control reversing switches to allow the user to control the direction of the model train.

When DC-powered model trains with permanent magnet motors were introduced, a different standard was developed for most two rail model train tracks where the direction of trains were controlled by the polarity of the DC track power applied to the track.

In the late 1940s Lionel added a new concept of applying DC on top of the AC track voltage to turn on and off an on-board whistle by remote control. This concept of high frequency transmission was introduced in the Lionel Electronic Train Control. This system supplied ten different signals that would control ten different remote control effects. The different high frequency signals were superimposed on the standard AC power when selected buttons were pressed at the control center. Each remote engine or rail car was equipped with a receiver unit that was tuned to the individual frequencies. When the correct high frequency signal was transmitted, the corresponding receiver would toggle or turn-on some remote effect.

These high frequency signals increase the ability to remotely control various effects but they had other problems. Transmission losses were usually high and it was critically important to keep the track, the track joints and the wheels of the receiving car or locomotive extremely clean. However extra feeder wires to different parts of the track were used to prevent signal losses and placing capacitors across the track joints and adding inductors at the power supply and on each accessory being used assisted in reducing signal loss and in ensuring that all components of the model train layout operated properly. All this additional equipment however added to the cost, the complexity, and the maintenance for the model train operator.

Model train manufacturers have, over the years, introduced different methods of applying high frequency signals to the model train track to increase the remote control capabilities including independent train control which means that the model train operator can control the speed, direction and features of a number of different engines all on the same powered track section. With most DC and AC systems however, the biggest problem is that there are only a limited number of remote control signals possible and their application is slow by modern digital standards.

The application of digital technology uses remote control signals to carry digital signals to decoders in the engine for digital command control of locomotives and other accessories. Digital Command Control is a method of controlling individual train engines, rail cars and accessories by transmitting digital remote control signals down the track to on-board digital receivers and decoders in the locomotives, wagons and other rolling stock and accessories.

DCC has been around since the 1970’s but had not received wide acceptance because of the limited technology at the time and the difficulty and expense of installing receivers in each engine. With developments in digital technology these problems have diminished and over the last ten to fifteen years major model train manufacturers have produced several different versions of DCC. So many that unfortunately customers have been confused about which system is best. As always, there remains no shortage of choices for the model train enthusiast.


Click Here To Visit Railwayshop